Thursday, December 6, 2012

FORM CREATION IN ORACLE

 
>Open WINSCP


>Then go to Template.fmb,path is FORM>>US>>TEMPLATE.FMB.copy this .fmb file in your desktop.
>Now you can close the winscp
>Then open FORM BUILDER,Delete the already existing Module “MODULE1”.


>Then open Template.fmb in Form Builder And save it with any other name (ex:my_info).

>Then go to Data Block and Delete the “Block Name”.


>Now similarly, go to Canvases and Windows and delete the Block Name.


> Canvas contain designing of the form. Now, to Create a new canvases Click on Add.

 
> Now go to Property Palette give Name (ex: my_can) and then go to Property Class>>Subclass            Information>>canvas


>Then you need to close the window


> Follow the same procedure for windows. Create a new window


>Now give Name, Subclass Information and Primary Canvas name.


>Now again go to canvas set the window name whatever we have added


>Now close the window and go to Data Block and add a new data block


> Then click ok

> Then click on next

>Then click on next


Then click on browse you will get connect give in there user name&pwd....

>Now you will get tables name,select your table name here


Then select the table that you have created or the table that is to be used

 >   Then pull all the fields or only required fields.


>Then click on next

>Then again click on next

>Then click on next


 >Now click on finish


>Then click on next.


 >Then again click on next

 >Now pull all the fields 


>Now click on next again

 >Now here we can modify the width and height

>Then click on next


>Again click on next

 >Then give the Frame Title
>Then click on next


>Now click on finish


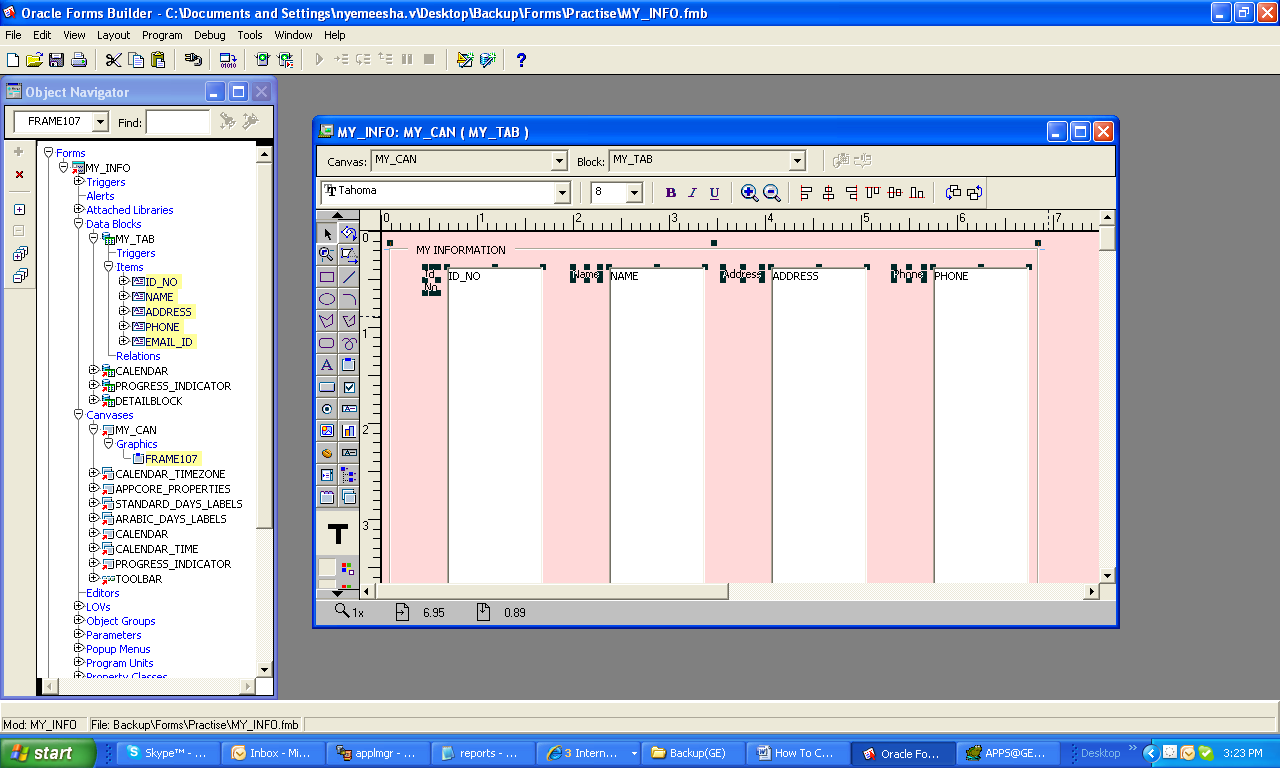
>Now we need to make the alignments based on our requirement


>Then add two buttons "save" and "exit"


>Now right click on the button and go to property palette

>Then after clicking on property palette give the Name, Subclass Information and Label
>   Similarly for Exit also.

>Now after giving values in property palette we will get


>Now press F11 by going on to the button 


>Now select “WHEN-BUTTON-PRESSED” 


>Click “WHEN-BUTTON-PRESSED”


>Then write the code in the PL/SQL Editor for both Save and Exit


>Then go to Program Units

XML PUBLISHER-ATTRIBUTES


Creating Placeholders:

The placeholder maps the template field to the XML element data field. At run time the placeholder is replaced by the value of the element of the same name in the XML data file.
Enter placeholders in your document using the following syntax:
<?XML element tag name?>

Defining Groups:

By defining a group, you are notifying XML Publisher that for each occurrence of an element, you want the included fields displayed. At run time  XML Publisher will loop through the occurrences of the element and display the fields each time.To designate a group of repeating fields, insert the grouping tags around the elements to repeat.

Insert the following tag before the first element:

<?for-each:XML group element tag name?>
Insert the following tag after the final element:
<?end for-each?>

Defining Headers and Footers:

Inserting Placeholders in the Header and Footer:
If your template requires multiple headers and footers, create them by using XML Publisher tags to define the body area of your report. You may also want to use this method if your header and footer contain complex objects that you wish to place in form fields. When you define the body area, the elements occurring before the beginning of the body area will compose the header. The elements occurring after the body area will compose the footer.

Multiple or Complex Headers and Footers

If your template requires multiple headers and footers, create them by using XML Publisher tags to define the body area of your report. You may also want to use this method if your header and footer contain complex objects that you wish to place in form fields. When you define the body area, the elements occurring before the beginning of the body area will compose the header. The elements occurring after the body area will compose the footer.
Use the following tags to enclose the body area of your report:
<?start:body?>
<?end body?>
Use the tags either directly in the template, or in form fields.

Template Features

Page Breaks

To create a page break after the occurrence of a specific element use the "split-by-page-break" alias. This will cause the report output to insert a hard page break between every instance of a specific element.

To insert a page break between each occurrence of a group, insert the "split-by-page-break" form field within the group immediately before the <?end for-each?> tag that closes the group. In the Help Text of this form field enter the syntax:
<?split-by-page-break:?>


Regrouping the XML Data

Regrouping Syntax

To regroup the data, use the following syntax:
<?for-each-group: BASE-GROUP;GROUPING-ELEMENT?>                                                                            
Images and Charts:

Images

XML Publisher supports several methods for including images in your published document:

Direct Insertion

Insert the jpg, gif, or png image directly in your template.

URL Reference

URL Reference
1.     Insert a dummy image in your template.
2.     In the Format Picture dialog box select the Web tab. Enter the following syntax in the Alternative text region to reference the image URL:
url:{'http://image location'}
For example, enter: url:{'http://www.oracle.com/images/ora_log.gif'}

OA Media Directory Reference

Note: This method only applies to Oracle E-Business Suite installations.
1.     Insert a dummy image in your template.
2.     In the Format Picture dialog box select the Web tab. Enter the following syntax in the Alternative text region to reference the OA_MEDIA directory:
url:{'${OA_MEDIA}/image name'}
For example, enter:
url:{'${OA_MEDIA}/ORACLE_LOGO.gif'}

Add Text to a Shape
You can add text to a shape dynamically either from the incoming XML data or from a parameter value. In the property dialog enter the following syntax:
<?shape-text:SHAPETEXT?>
where SHAPETEXT is the element name in the XML data. At runtime the text will be inserted into the shape.
Add Text Along a Path
You can add text along a line or curve from incoming XML data or a parameter. After drawing the line, in the property dialog enter:
<?shape-text-along-path:SHAPETEXT?>
where SHAPETEXT is the element from the XML data. At runtime the value of the element SHAPETEXT will be inserted above and along the line.
Moving a Shape
You can move a shape or transpose it along both the x and y-axes based on the XML data. For example to move a shape 200 pixels along the y-axis and 300 along the x-axis, enter the following commands in the property dialog of the shape:
<?shape-offset-x:300?>
<?shape-offset-y:200?>
Rotating a Shape
To rotate a shape about a specified axis based on the incoming data, use the following command:
<?shape-rotate:ANGLE;'POSITION'?>

Conditional Formatting

Conditional formatting occurs when a formatting element appears only when a certain condition is met. XML Publisher supports the usage of simple "if" statements, as well as more complex "choose" expressions.
The conditional formatting that you specify can be XSL or XSL:FO code, or you can specify actual RTF objects such as a table or data. For example, you can specify that if reported numbers reach a certain threshold, they will display shaded in red. Or, you can use this feature to hide table columns or rows depending on the incoming XML data.

If Statements

Use an if statement to define a simple condition; for example, if a data field is a specific value.
1.     Insert the following syntax to designate the beginning of the conditional area.
<?if:condition?>
2.     Insert the following syntax at the end of the conditional area: <?end if?>.
.
 If-then-Else Statements

Use the following syntax to construct an if-then-else statement in your RTF template:
<?xdofx:if element_condition then result1 else result2 end if?>